Creating the harmonizing block
We can start by using a generator to generate a scaffolded block, to which you will be adding your own implementation. After you provide the block name (using whatever case you want, e.g. tickets summary) and domain (e.g. support), it will create a new folder with the files: ./packages/blocks/support/tickets-summary/.
Declaring dependencies
The very first thing we need to do is to add the required modules to the block dependencies. This block relies on:
- CMS module to fetch static content, like labels,
- Tickets module to fetch the tickets.
Generated code already includes the CMS dependency, but we still need to add the Tickets. Let's open ./tickets-summary.module.ts and define it:
// importing the `Tickets` module
import { CMS, Tickets } from '../../models';

@Module({})
export class TicketsSummaryBlockModule {
    static register(_config: ApiConfig): DynamicModule {
        return {
            module: TicketsSummaryBlockModule,
            // adding `Tickets.Service` as a provider to this block
            providers: [TicketsSummaryService, CMS.Service, Tickets.Service],
            controllers: [TicketsSummaryController],
            exports: [TicketsSummaryService],
        };
    }
}
Defining data models
The next thing we need to do, is to define the aggregated data model for the block. Let's open the ./tickets-summary.model.ts and a few properties:
export class TicketsSummaryBlock extends Block.Block {
    // the `__typename` property uniquely identifies this block
    __typename!: 'TicketsSummaryBlock';
    title!: string;
    tickets!: {
        open: TicketData;
        closed: TicketData;
        latest: TicketDetailsData;
    };
}

export type TicketData = {
    label: string;
    value: number;
};

export type TicketDetailsData = {
    title: string;
    topic: {
        // for value we re-use the type from the Ticket
        value: Tickets.Model.Ticket['topic'];
        // and label is a simple string
        label: string;
    };
    type: {
        value: Tickets.Model.Ticket['type'];
        label: string;
    };
    editDate: {
        label: string;
    };
};
Since this block will not require any parameters, we don't need to modify the model for the incoming request, and the one autogenerated in /tickets-summary.request.ts will suffice.
Securing the block endpoint
Blocks can use both role-based and permission-based access control. The generated controller already includes the @Roles() decorator, but you can also add @Permissions() decorator to protect specific resources.
Here's how you might secure a block that deals with sensitive data:
import { Auth } from '@o2s/framework/modules';

@Controller(URL)
@UseInterceptors(LoggerService)
export class TicketsSummaryController {
    constructor(protected readonly service: TicketsSummaryService) {}

    @Get()
    @Auth.Decorators.Roles({ roles: [] })
    @Auth.Decorators.Permissions({ resource: 'tickets', actions: ['view'] })
    getTicketsSummaryBlock(
        @Headers() headers: AppHeaders,
        @Query() query: GetTicketsSummaryBlockQuery
    ) {
        return this.service.getTicketsSummaryBlock(query, headers);
    }
}
When to use roles vs permissions:
- Roles: Often configured via CMS for pages, simpler access control. Use when you need broad access decisions.
- Permissions: Protect specific resources, can be extracted from organization roles (IAM-dependent). Use when you need fine-grained control over what users can do with specific resources.
Both decorators can be used together on the same endpoint. For more details, see the authentication documentation.
Fetching data
With that ready, we can now fetch the data in ./tickets-summary.service.ts. Start by adding the Tickets.Service:
import { CMS, Tickets } from '../../models';

...

constructor(
    private readonly cmsService: CMS.Service,
    private readonly ticketsService: Tickets.Service,
) {}
that we can use to fetch the tickets in the main method:
getTicketsSummaryBlock(query: GetTicketsSummaryBlockQuery):Observable<TicketsSummaryBlock> {
    // fetching the static content
    const cms = this.cmsService.getTicketsSummaryBlock(query);
    // fetching tickets - let's assume that the summary takes
    // into the account 1000 latest tickets
    const tickets = this.ticketsService.getTicketList({ limit: 1000 });

    // we don't need any orchestration here, so
    // we can make both requests at the same time
    return forkJoin([cms, tickets]).pipe(map(([cms, tickets]) =>
        // once we have both responses, we pass them to the mapper
        mapTicketsSummary(cms, tickets, query.locale)));
}
Mapping data
The last step is to aggregate the data from the CMS and from the tickets integration into one object for the frontend app. To do that, let's edit ./tickets-summary.mapper.ts file and map the data:
import { CMS, Tickets } from '../../models';

export const mapTicketsSummary = (
    cms: CMS.Model.TicketsSummaryBlock.TicketsSummaryBlock,
    tickets: Tickets.Model.Tickets,
    locale: string,
): TicketsSummaryBlock => {
    const latestTicket = tickets.data[0];

    // to get the number of open/closed tickets,
    // we can just filter them by status
    const countTicketsByStatus = (status: Tickets.Model.TicketStatus): number => {
        return tickets.data.filter((ticket) => ticket.status === status).length;
    };

    return {
        __typename: 'TicketsSummaryBlock',
        // every block should be identified by it's ID
        id: cms.id,
        title: cms.title,
        tickets: {
            open: {
                label: cms.labels.open,
                value: countTicketsByStatus('OPEN'),
            },
            closed: {
                label: cms.labels.closed,
                value: countTicketsByStatus('CLOSED'),
            },
            latest: {
                title: cms.labels.latest,
                topic: {
                    // pick the correct label from the CMS
                    label: cms.fieldMapping.topic?.[latestTicket.topic],
                    // but let's also pass the value as well
                    value: latestTicket.topic,
                },
                type: {
                    label: cms.fieldMapping.type?.[latestTicket.type],
                    value: latestTicket.type,
                },
                editDate: {
                    // let's format the date for a more user-friendly format
                    value: formatDateRelative(latestTicket.updatedAt, locale, cms.labels.today, cms.labels.yesterday),
                },
            },
        },
    };
};
Adding permission flags to block responses
If your block needs to conditionally show features based on user permissions, you can add permission flags to the block model and populate them in the service.
First, add permissions to your block model:
export class TicketsSummaryBlock extends Block.Block {
    __typename!: 'TicketsSummaryBlock';
    title!: string;
    tickets!: {
        open: TicketData;
        closed: TicketData;
        latest: TicketDetailsData;
    };
    permissions?: {
        view: boolean;
        edit: boolean;
    };
}
Then, in your service, use canPerformActions() to populate the permission flags:
import { Auth } from '@o2s/framework/modules';

@Injectable()
export class TicketsSummaryService {
    constructor(
        private readonly cmsService: CMS.Service,
        private readonly ticketsService: Tickets.Service,
        private readonly authService: Auth.Service,
    ) {}

    getTicketsSummaryBlock(
        query: GetTicketsSummaryBlockQuery,
        headers: AppHeaders,
    ): Observable<TicketsSummaryBlock> {
        const cms = this.cmsService.getTicketsSummaryBlock(query);
        const tickets = this.ticketsService.getTicketList({ limit: 1000 });

        return forkJoin([cms, tickets]).pipe(
            map(([cms, tickets]) => {
                const result = mapTicketsSummary(cms, tickets, query.locale);

                // Extract permissions using auth service
                if (headers.authorization) {
                    const permissions = this.authService.canPerformActions(
                        headers.authorization,
                        'tickets',
                        ['view', 'edit']
                    );

                    result.permissions = {
                        view: permissions.view ?? false,
                        edit: permissions.edit ?? false,
                    };
                } else {
                    // Default permissions if no authorization token
                    result.permissions = {
                        view: true,
                        edit: false,
                    };
                }

                return result;
            }),
        );
    }
}
Don't forget to inject Auth.Service in your module:
@Module({})
export class TicketsSummaryBlockModule {
    static register(_config: ApiConfig): DynamicModule {
        return {
            module: TicketsSummaryBlockModule,
            providers: [
                TicketsSummaryService,
                CMS.Service,
                Tickets.Service,
                Auth.Service,  // Add Auth.Service for permission checking
            ],
            controllers: [TicketsSummaryController],
            exports: [TicketsSummaryService],
        };
    }
}
On the frontend, you can then use these permission flags to conditionally render features:
export const TicketsSummary: React.FC<TicketsSummaryProps> = async ({ id, accessToken, locale }) => {
    let data: Model.TicketsSummaryBlock;
    try {
        data = await sdk.blocks.getTicketsSummary({ id }, { 'x-locale': locale }, accessToken);
    } catch (_error) {
        return null;
    }

    // Check view permission - if not allowed, don't render
    if (!data.permissions?.view) {
        return null;
    }

    return (
        <TicketsSummaryDynamic
            {...data}
            // Pass permissions to client component for feature-level checks
        />
    );
};
And within the client component:
export const TicketsSummaryPure: React.FC<TicketsSummaryPureProps> = ({ permissions, ...component }) => {
    const canEdit = permissions?.edit ?? false;

    return (
        <div>
            {/* Edit button only shown if user has edit permission */}
            {canEdit && (
                <Button onClick={handleEdit}>Edit</Button>
            )}
        </div>
    );
};
Importing the block and extending the block list
The module part of the block has to be imported into the NestJS app for the block's API endpoints to be exposed. This happens within the apps/api-harmonization/src/app.module.ts file:
import * as TicketsSummary from '@o2s/blocks.tickets-summary/api-harmonization';

...


@Module({
    imports: [
        ...,
    TicketsSummary.Module.register(AppConfig),
        ...,
    ]
})
As a last step, we need to add the new block's name to the Blocks type so that the frontend app would be able to resolve it correctly (when choosing which block to render). Let's open the apps/api-harmonization/src/modules/page/page.model.ts file and add the block's __typename to the list:
import * as TicketsSummary from '@o2s/blocks.tickets-summary/api-harmonization';

...

export type Blocks =
    ...
    | TicketsSummary.Model.TicketsSummaryBlock['__typename'];
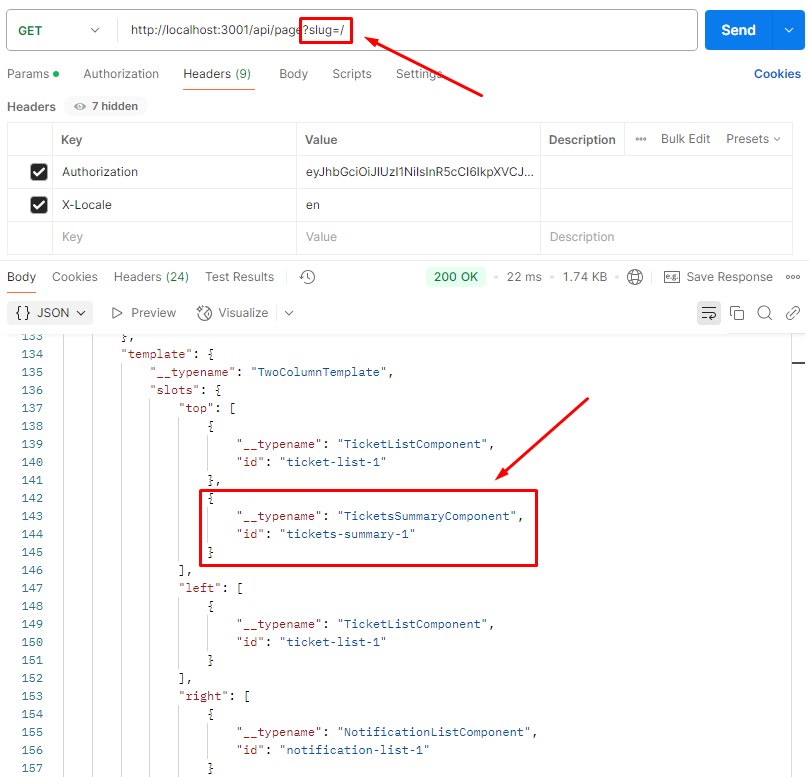
Testing the API
Once the model, service and mapper are ready, we should make sure that it actually works. To do that let's again query the API Harmonization server, but this time just for this block instead of page:
- the localhost port is defined by the
PORTenv variable (default3001), - there is an optional prefix that is added, defined by the
API_PREFIXenv variable (default/api), - finally, the path of the block is declared in the
./index.tsfile (default'/blocks/tickets-summary'),
which gives a final URL of http://localhost:3001/api/blocks/tickets-summary.
There are also some mandatory headers that we need to add:
Authorizationin the format of bearer token (e.g.Bearer eyJhbG...),X-Localein the format of IETF language tag (e.g.en).
Let's again use Postman for this: